Showing posts with label Central Front. Show all posts

Friday, 19 July 2024

In a Dark Wood - Warsaw Pact Order of Battle

Comrades! In this special edition of the Pravda we will meticulously examine the glorious Socialist forces assigned to liberating the proletariat in southern Germany, oppressed by the illegal government of Bonn and their capitalist collaborators from the American VII Corps and other NATO lackeys, already described in a previous issue of the Pravda.

This sector of the Western Theatre will be covered by the fourth module of the Marxist - Leninist doctrinally correct C3 series, designated as object C3-1985-4 "In a Dark Wood".

And remember, the Motherland needs you! Report to the Western Military Commissariat at info@TRLGames.com to volunteer immediately for OPERATION LADOGA, also known as OPERATION APEX PREDATOR in the decadent capitalist countries.
-----------------------------------------------------------------------

Finding any coherent historical Warsaw Pact plans for a war against NATO is nearly impossible. Most available plans are heavily influenced by political agendas, starting with a NATO attack followed by a Warsaw Pact counteroffensive, often involving indiscriminate use of tactical nuclear weapons from the outset. Additionally, the expected rate of advance for Warsaw Pact forces is utterly unrealistic, likely the result of either excessive vodka consumption or the need to appease the Politburo.

An improbable Czechoslovakian war plan, reaching Nurnberg by D+2.

The Warsaw Pact's strategic plan used for the C3 series, codenamed Operation Ladoga, focuses its main effort on northern Germany, specifically in the BAOR and West German / Dutch I Corps sectors (see The Dogs of War and Die Festung Hamburg modules).

Therefore, the Warsaw Pact's objective in southern Germany is not a grand breakthrough to the Rhine, but a deliberate, energetic offensive to pin down and inflict as much damage as possible to the NATO forces and the incoming reinforcements in the sector.

To this end, some formations from the Belorussian and Carpathian Military Districts began mobilizing early to be ready by D0, providing the offensive in the Southern sector with sufficient punching power. The full Czechoslovak People's Army is also present, bringing four first-line divisions, and an additional four second-line divisions within a few days.

Let's go down to the details of the Warsaw Pact forces that will engage US VII Corps in the Wurzburg - Nurnberg sector.

The Soviet Forces

The main Soviet formation is the 28th Combined Arms Army from the Belorussian Military District, including the following units:

  • 6th Guards Tank Division (CAT II)
  • 28th Tank Division (CAT III)
  • 50th Motorised Rifle Division (CAT III)
  • 111th Artillery Regiment (2S5 Hyacint-S, 2A36 Hyacint-B)
  • 1199th Artillery Regiment (9P140 Uragan MLRS)
  • 330th Helicopter Regiment (Mi-24)
  • 233rd Missile Brigade (9K714 Oka)
Soviet 6th Guards Tank Division

The following additional formations are also available:
  • 24th Motorised Rifle Division (CAT II, Carpathian MD)
  • 39th Independent Landing-Assault Brigade (Carpathian MD)
While the Soviets are missing their usual huge numbers of ground troops, they can count on a heavy fire support from four missile brigades, mostly from the Group of Soviet Forces in Germany. 
  • 119th Missile Brigade (TR-1 Temp-S, GSFG)
  • 164th Missile Brigade (9K72 Elbrus, GSFG)
  • 175th Guards Missile Brigade (9K72 Elbrus, GSFG)
  • 185th Guards Missile Brigade (9K72 Elbrus, Central Group of Forces)

Mass firepower and bombardment of strategic objectives could make a difference in a sector where the difficult terrain limits the space of manoeuvre to a few, well identified roads.

Soviet 164th Missile Brigade

The Czechoslovak People's Army

On short and medium term, Czechoslovakia can contribute to the liberation of Europe with two armies from Western Military District: The 1st Army including four first-line division, and the 4th Army with four second-line divisions.

The equipment of these two armies is on average below the standard of the Soviet units in eastern Europe. The most used MBT is still the T-54/T-55, and the self-propelled / towed artillery ratio is far from optimal as at least half of the division-level artillery still uses old M-30 / D-30 towed guns.

Moreover, it must be noted that the Czech tank regiments include only one motorised rifle company each, making them practically "pure" tank units.

Czech 1st Army

  • 1st Tank Division (1st Line)
  • 2nd Motorised Rifle Division (1st Line)
  • 19th Motorised Rifle Division (1st Line)
  • 20th Motorised Rifle Division (1st Line)
  • 321st Heavy Artillery Brigade (9K72 Elbrus)
  • 322nd Cannon Artillery Brigade (SpGH DANA, M-46 towed)

Czech 4th Army

  • 3rd Motorised Rifle Division (2nd Line)
  • 4th Tank Division (2nd Line)
  • 9th Tank Division (2nd Line)
  • 15th Motorised Rifle Division (2nd Line)
  • 331st Heavy Artillery Brigade (9K72 Elbrus)
  • 332nd Cannon Artillery Brigade (M-46 towed, wz. 18/46 towed, SpGH DANA)
Czech 1st Tank Division

On the other hand, the artillery support from Western Military District is above average, as it includes a good number of  locally produced SpGH DANA self-propelled artillery and RM-70 Multiple Launch Rocket System.

Western Military District

  • 17th High Power Artillery Battalion (2s7 Pion)
  • 71st Cannon Artillery Brigade (M-46 towed)
  • 74th Rocket Launcher Brigade (RM-70 MLRS)
  • 75th Heavy Howitzer Brigade (SpGH DANA)
  • 311th Heavy Artillery Brigade (9K72 Elbrus, OTR-23 Oka)

Czech SpGH DANA, and its C3 unit equivalent

Czech RM-70 Rocket Artillery, and its C3 unit equivalent

Last but not least, the Czech can also add some attack helicopter and a small airmobile unit to the fray:

  • 11th Helicopter Regiment (Mi-24D)
  • 22nd Special Purpose Airborne Regiment

Conclusions

To my surprise, some playtest results seems to indicate that the overall situation in this sector of the front is initially more favourable to Warsaw Pact than expected. The reasons for this are:
  1. The extensive length of the front to be defended, including the potential for an attack from the north if the Soviet 8th Guards Army succeeds in breaking through.
  2. The insufficient number of NATO covering forces: the US 2ACR and one or two battalions spread across a 200 km front.
  3. The peacetime deployment of NATO forces, positioned too far from the FEBA, as seen in other sectors.
  4. The limited number of roads available for NATO to reach the front line, making them easy targets for Warsaw Pact interdiction and bombardment.
Of course, this could change quickly once French and Canadian forces arrive... We shall see!

A possible Warsaw Pact plan for the sector


Wednesday, 12 June 2024

In a Dark Wood - NATO Order of Battle


We have almost completed the Order of Battle for the upcoming In a Dark Wood.

NATO OOB for this sector had several unique features and assignments, requiring additional research and, guess what, more discussions than usual.

In this post, I will describe some of the NATO formations committed to the defense of US VII Corps sector and adjoining areas. 

You will also find a snapshot of some documents we used to define the details, they should help to give an idea of how deep the rabbit's hole goes.

And remember the drill! Volunteer now for OPERATION APEX PREDATOR by writing to info@TRLGames.com, or have Gunnery Sergeant Hartman unhappy and stomping your guts out. 

WG 12. Panzer Division Structure and Fire Support - Please note the US units in it.

A General Defense Plan for US VII Corps Sector

A plan for WG 36.Pz Brigade

A local counterattack plan for WG 36.Pz Brigade

In the end, the most probable NATO General Defense Plan for the area covered by the map had the following formations assigned, from North to South:

  • 2x brigades from WG 12.Pz Division (US VII Corps, more on this later)
  • 1x brigade from US 1st Infantry Division (WG 12.Pz Division, more on this later)
  • US 2nd Armored Cavalry Regiment (US VII Corps)
  • US 1st Armored Division (US VII Corps)
  • 2x brigades from WG 4.PG Division (WG II Corps)


NATO also had consistent reserves, already in West Germany or arriving as reinforcement:
  • CA 4th Mechanised Brigade Group
  • US 3rd Infantry Division 
  • FR II Corps, with two armored "divisions" (actually, large brigades)
  • FR Force d'Action Rapide, with one airmobile "division", one airborne division, one light armored "division"
  • 2x brigades from US 1st Infantry Division (REFORGER)

In 1985 US 3ID was the first and probably only division having completed the conversion to the  heavier and mostly aborted "Division 86" structure. Therefore, it fielded three brigades fully equipped with M1 Abrams and M2 Bradley, plus a fourth Combat Aviation Brigade with a cavalry battalion and attack helicopters, activated in March, 1985.

All considering, a dangerous beast.

An anomaly in NATO deployment, WG 12.Pz was in theory subordinated to WG III Corps, but actually deployed far from it. As a consequence, its 34.Panzer Brigade was assigned as WG III Corps operational reserve, while its remaining two brigades (35.PG and 36.Pz) were under US VII Corps command. 

To compensate for the loss of 34.Pz Brigade, the US 1ID (Fwd) Brigade was attached to WG 12.Pz until the arrival of the rest of the division via REFORGER.

Well trained and heavily equipped, the Canadian brigade could hold its ground in a more than satisfactory manner, and could be assigned to US VII Corps or WG II Corps. We opted for the former.
EDIT: the two mech Bn here have the wrong icon, it should be M113.


Stationed in West Germany, the French II Corps consisted of two Divisions Blindée (armoured divisions, actually the size of a large brigade) of good quality, equipped with AMX-30 tanks and AMX-10 AFVs. Corps-level fire support included attack helicopters and Pluton nuclear missiles.

French Force d'Action Rapide (FAR)

The French FAR (Rapid Deployment Force) consisted of several divisions, covering all possible types of force projection. Some of them would have probably been used in West Germany in case of a full-scale conflict against the Warsaw Pact.
The 4e Division Aeromobile was conceptually similar to the experimental US 9th Infantry Division: lightly equipped infantry, with a strong support of attack helicopters. The French Army pushed this concept to its limit, as the division had only one infantry battalion supported by three AH squadrons.
EDIT: The Attack Helicopter squadrons were actually able to support the whole FAR, and should have FAR as Parent HQ, 

The 11e Division Parachutiste was a classical airborne division. No matter how badass, its battalions were composed of four infantry companies and one heavy weapons company, making them only slightly better than a WG Jagerbattalion.
EDIT: The 11e Division Parachutiste TO&E is still under review.
The 6e Division Légère Blindée was a light armoured division, in this case too more the size a large brigade.
EDIT: The 68e Regiment Artillerie had older 155mm Bf-50 tubes, the icon and range will change.


Monday, 6 May 2024

In a Dark Wood - Box Art Draft

First serious draft for the box art of the C3 Module #4, In a Dark Wood. Forests are never particularly reassuring, particularly when you are in enemy territory.

I think you know the drill....Report for Duty by writing to the Quartermaster at info@TRLGames.com, and reserve your combat equipment!

Also, we'll probably have a big announcement in a couple of weeks...No, it's not what you expect :)


Sunday, 28 April 2024

In a Dark Wood - Here is the Battlefield

Well, after a long pause in Greece we are back to our favourite, familiar and apocalyptic World War Three environment! Ah, nothing better than the smell of napalm in the morning.

Here's the first complete, almost approved version of the map for the C3 Module #4 - In a Dark Wood. Actually, Tony is still griping about it, but that's not big news...He always does :D

The map is slightly bigger than the Less Than 60 Miles one, in order to include the whole US VII Corps Area of Responsibility.


The discussion in the development team (Tony, Nicolas, John, Lionel and me) is now moving to the Warsaw Pact OOB, the NATO chain of command, and the exact TO&E of French II Corps divisions....We will see what is going to happen there. 

In the meantime, do not wait! Volunteer immediately for OPERATION APEX PREDATOR by writing to info@TRLGames.com, and prepare to join the fight in the US VII Corps sector.


Friday, 27 May 2022

Die Festung Hamburg - NATO OOB, Samples and Notes

The NATO OOB for the next C3 Module Die Festung Hamburg is almost complete. The area covered is the Northern Sector of NORTHAG, defended by a true multinational force including Denmark, The Netherlands, West Germany, United Kingdom and United States.

Here's some notes on the various nationalities, each one with sample units.

Denmark

The main Danish contribution to the defense of the Schleswig-Holstein sector is the Jutland Division. Unfortunately, as written by David Isby in Armies of NATO's Central Front, "Jutland Division certainly lies at the lower end of the spectrum among NATO's mechanized divisions."

The wartime tactical organization was the well-known Combined Arms battalions equipped with Leopard 1A3, M113 and some (few) anti-tank and combat support equipment.

The division was manned only at 20% during peacetime, and shared the same problems plaguing the rest of the Danish Army: low funding, insufficient training and low ammunition stockpiles. Moreover, the time needed to mobilise the missing 80% personnel could have been significantly long.


West Germany

The Bundeswehr has the Northern slice of WG I Corps, the combined WG/NL I Corps and the LANDJUT Corps represented. The total forces were approximately two PanzerGrenadier and one Panzer divisions, reinforced by some Heimatschutzbrigade and Heimatschutzregiment from the territorial army. 

An additional Panzer division - the NORTHAG strategic reserve - was also available, but of course committing it would have been a quite drastic decision.


The Netherlands

Dutch Army added a whole Corps to NORTHAG defense...In theory. In reality, only a single brigade plus some combat support were near the FEBA, with everything else stationed in the Netherlands 300 km to the west. Moreover, the very complicated Dutch mobilisation system needed time to bring the manoeuvre units to operational status.

On the positive side, the Dutch units were among the heaviest in the NATO arsenal, with up to 20 MBTs, 40 APCs and 12 combat support AFVs for each mechanized battalion.

The tactical organisation and combat values of the Dutch units gave life to one of the most heated discussions in the development team thus far. A detailed explanation of the different points of view will be probably available in the Designers' Notes :)


United Kingdom

In a war against Warsaw Pact, the UK Mobile Force Brigade would have moved by sealift to one of the following areas of deployment:

  1. Schleswig-Holstein, to reinforce LANDJUT Corps
  2. Northern or Insular Denmark, to reinforce COMBALTAP

UK Mobile Force is also Tony Morphet's Secret Love, as he was heavily involved with this formation during his years of active service :)

In the end, it will be up to NATO Commander to decide where to commit the brigade, with each choice having its pros and cons.


United States

In 1985, the 3rd Brigade of 2nd Armoured Division was stationed near Bremen, acting as the forward element of US III Corps.

The brigade would have probably remained under strict US control and was missing most of its support assets (Trucks, fuel tankers, maintenance, medical services). Consequently, the combat value for its battalions is lower than other similar US units.

EDIT 20220827: After considerable additional research and help from several veterans who served in the brigade, we determined our first evaluation was vastly wrong! 2AD (Fwd) could actually act as NL I Corps covering force in case of need, and also had additional logistic support allowing independent operations for a limited time. The latest OOB version reflects these changes.


Want to defend the free world from the Russian hordes?
Want to free the German Workers enslaved by the American plutocrats?

Enlist by writing to info@TRLGames.com! Your Country, Bloc, Motherland, whatever needs YOUSee the link below to know how you can help:

Thin Red Line Games Mobilisation Plan


Wednesday, 4 May 2022

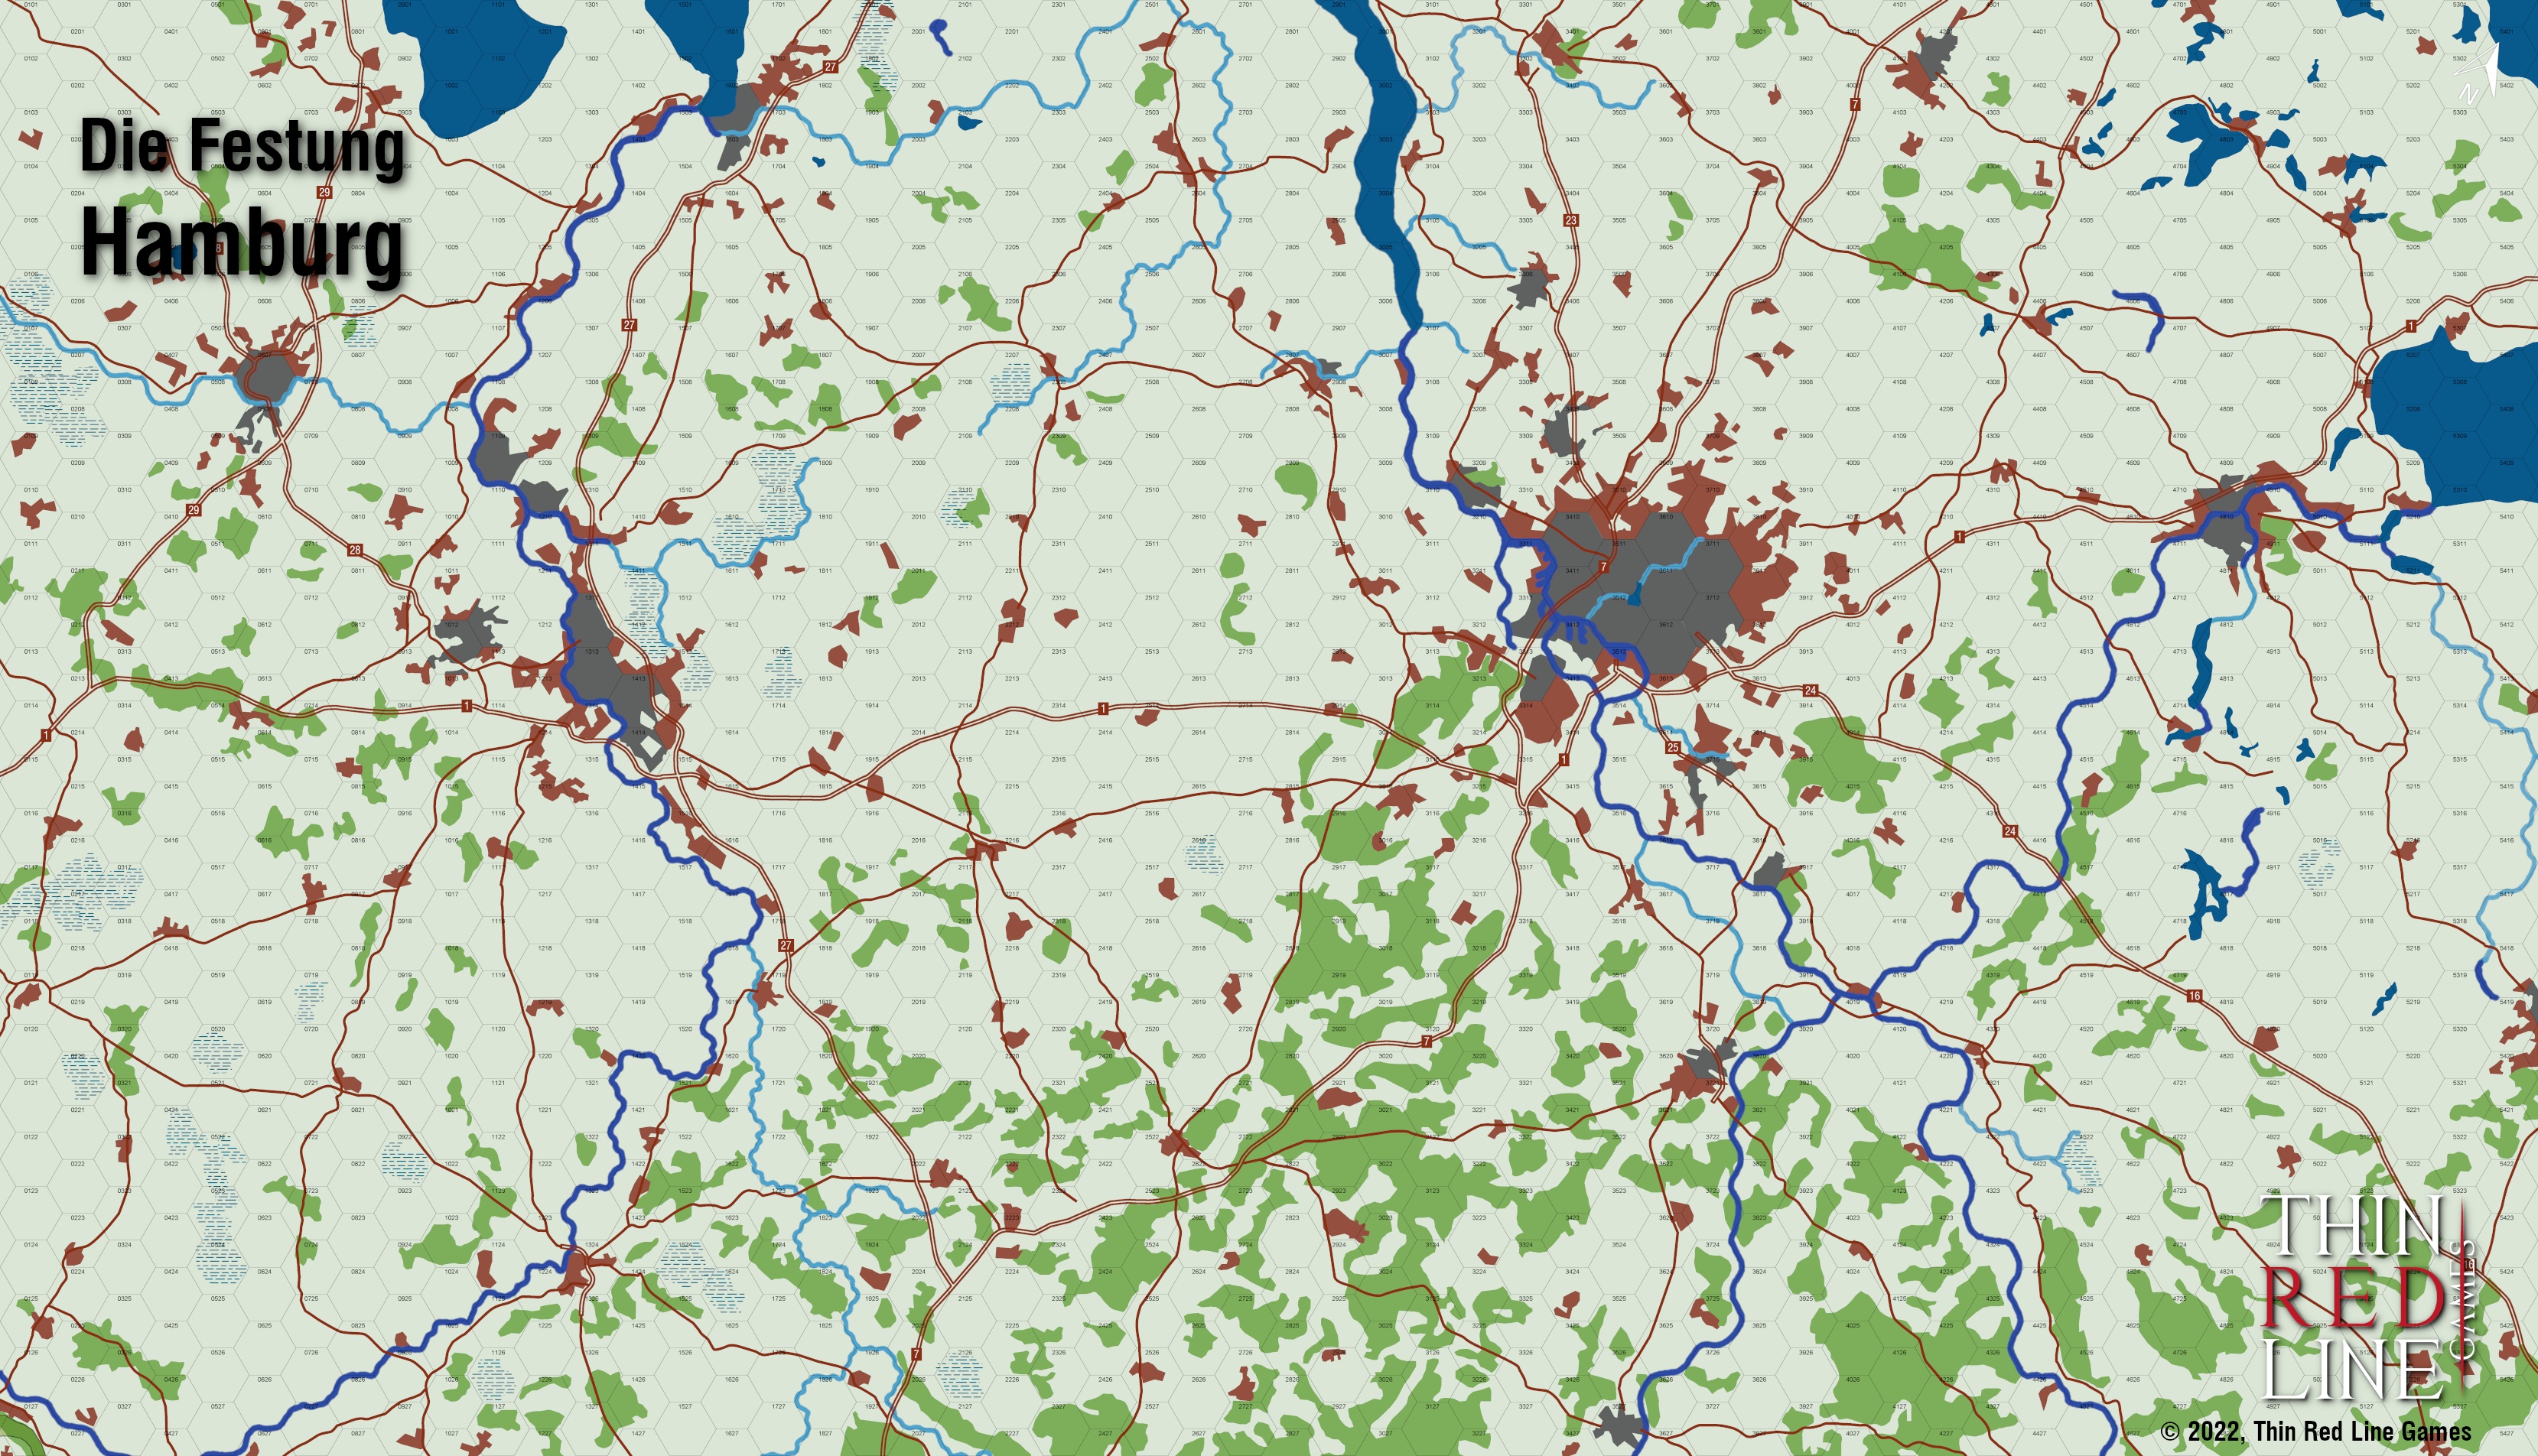
Die Festung Hamburg - Map Draft

Here's the latest map draft for the upcoming Die Festung Hamburg, covering the 1985 Warsaw Pact offensive in the North German Plain sector. Some details are still missing (airfields, bridges, map labels, etc) but we're getting near. 

The absence of significant elevations and the vast road network should help Warsaw Pact's mechanized offensive, but things are made harder by the extended urban areas and by several formidable water obstacles.

On this latter point, I think some additional details could be interesting:

  • The final stretch of the Elbe river is one to four kilometres wide, and even before reaching Hamburg it could be very difficult to cross. We're still evaluating which ones among the several available crossing methods could be used in specific areas.

  • The Elbe-Lübeckkanal had features built specifically to slow down a Warsaw Pact offensive and make any crossing attempt problematic. Consequently, it is represented as a major river despite being relatively narrow. See this footage of 6. Panzergrenadierdivision experimenting the Kanal:


Want to defend the free world from the Russian hordes?
Want to help the German Workers enslaved by the American plutocrats?
Enlist by writing to info@TRLGames.com! Your Country, Bloc, Motherland, whatever needs YOU!


Tuesday, 8 September 2020

The Dogs Of War - "The River Weser Deep and Wide" AAR

As you probably know, The Dogs Of War will be the second module of the C3 Series, covering the British Army Of the Rhine sector during the 1985 NATO - Warsaw Pact conflict. 

The Dogs Of War heavily focuses on the problems of Command, Control and Communication and uses an updated version of the Less Than 60 Miles rules. The main changes are:

  • West German Auftragstaktik (Mission-Type Orders), giving Bundeswehr a flexibility hardly obtained by other armies.
  • British Engineers, allowing BAOR to use Defensive Works to their maximum effect.
  • Soviet Sappers, first-line assault units used to crack the toughest nuts.
  • A different method to mark the Posture of each unit, removing the need to use separate Posture markers.

The following AAR covers the first 24 hours of "The River Weser Deep and Wide" Campaign. At 0600ZT July 24, 1985 the Soviet 3rd Shock and 20th Guards Tank Armies cross the Inner German Border. NATO did not react quickly enough to the increasing signals of an imminent attack and is caught partially unprepared.

Remember to reserve a copy by writing to info@TRLGames.com ;)

D+0, H06

The First Echelon of two Soviet Armies, composed by four divisions, attacks along a wide front. NATO covering forces and refugees slow down the Pact's advance.

76th Guards Airborne division is inserted North of Hameln, blocking some key bridges needed by BAOR to cross the Weser. 

NATO starting situation is far from optimal. The main problem is the absence of Belgian I Corps, for the most part still moving from Belgium and Rhine area. Most of BAOR forces are also far from their assigned positions, and the insertion of Soviet 76th Guards Airborne Division doesn't make things better.

West German 1 Panzer in the North and 2 PanzerGrenadier in the South are forced to adjust their Area of Responsibility, in order to cover the front left open respectively by British I Corps and Belgian I Corps.


D+0, H09

Warsaw Pact launches several air strikes against the Belgian units advancing in Road Posture, causing delays and moderate losses.

In the South, Soviet 3rd Shock Army pushes hard against NATO covering forces, with its two Second Echelon divisions approaching. In the North, 20th Guards Army advances toward Braunschweig and reaches the Eastern bank of Elbe-Seitenkanal.

Ever since the first hours of war NATO artillery is particularly effective bombarding WP formations in March Assault Posture in open terrain, slowing down their assault and inflicting some losses too.


BAOR Commander decides that Soviet 76th Guards must be eliminated, no matter the situation on the FEBA. British 4th Armoured division is assigned to the task and proceeds to attack the Southernmost Soviet positions, inflicting heavy losses to 234th Guards regiment.

Despite having its Southern flank exposed, West German 1 Panzer division decides to apply the "Forward Defense" doctrine to the letter and to defend Braunschweig vigorously. To this end, 24/2/1 Panzer battalion starts deploying in Active Defense Posture in order to counterattack should an opportunity arise.


D+0 H12

WP ground crews are overloaded and unable to keep the pace in refitting / reloading the fighter-bombers, forcing the Soviet Front Commander to stop the air strikes against the advancing Belgian columns.

Despite the extensive usage of engineers and ribbon bridges, Soviet 25th Tank division struggles to cross the Elbe-Seitenkanal in front of WG 33/11PG brigade's resistance. Pact's divisions make good gains in the other sectors of the front, putting several NATO battalions in a dangerous position.

32nd Guards Tank division also arrives in the area, forming the Second Echelon for 20th Guards Army.

SIGINT allows Warsaw Pact to pinpoint the location of West German 2 Panzer brigade's HQ. A strike using 27th SCUD-2 regiment is launched, inflicting heavy losses on the HQ. Heavy artillery bombardments also hit several battalions of WG 1 Panzer Division.  

While the rest of NATO forces rushes to the front, British 20/4A brigade renews its attacks against the Soviet paratroopers, finally forcing the few survivors of 234th Guards regiment to surrender. 


D+0 H15

Soviet 90th Guards Tank arrives East of Celle, putting additional pressure on West German's 33/11PG brigade. 

25th Tank division begins fording the Elbe-Seitenkanal using Prepared Crossing, but its regiments are forced to stop on the opposite bank to reorganize. 

35th Motorized Rifle division assault the defensive positions of WG 2/1Pz in Eastern Braunschweig, and is repulsed with moderate losses.

Soviet 10th Guards Tank and 7th Guards Tank divisions continue their advance North, with the latter slowed down by several NATO air strikes along Autobahn 243 (hexes 3520, 3521).

With British forces still organizing, a heavy Soviet artillery bombardment kills the survivors of 2nd Royal Green Jackets regiment, already worn out by 10 hours of continuous disengagements under enemy pressure.

West German 2/1Pz brigade takes the opportunity for a local counterattack: 24th Panzer regiment quickly changes from Active Defense to Assault and attacks the rear elements of 219th Mot. Rifle regiment, still recovering from the failed assault on Braunschweig. The surprise is complete and the  Soviet regiment ceases to exist as an organized military formation (hex 4715).

British 4th Armoured division continues its attacks against the Soviet paratroops. After heavy fighting, 104th Guards regiment and its accompanying artillery are destroyed.

D+0 H18

NATO deep air strikes in East Germany temporarily interrupts the supply flow to Warsaw Pact's Northern Front. This is particularly bad news as several Soviet artillery regiments are short of ammunition.

With both banks of Elbe-Seitenkanal secured, a Ribbon Bridge is finally built over the water obstacle, allowing the bulk of 25th Tank division to cross it safely.

Pact's air reconnaissance successfully pinpoints the location of WG 2-161 Attack Helicopters squadron FARP (Forward Arming and Refueling Point). A combined SSM + Air strike follows, inflicting heavy damage to the squadron (hex 4003).

Despite the NATO counterattack, part of 35th Motorized Rifle division continues its assault on Braunschweig. The southern suburbs are conquered, but the attack on the city center is repelled by 21 Panzer battalion.

In the South, 10 Guards Tank and 7th Guards Tank division continue their advance. As the flanks of 7th Guards Tank are now dangerously exposed. Soviet 3rd Shock Army Commander decides to commit 47th Guards Tank division to protect them. 

The arrival of Soviet 90th Guards Tank division in the Celle area forces 3/1Pz brigade to take position South of the town, in order to allow 33/11PG brigade to concentrate on the endangered sector.

After its successful counterattack, 24th Panzer battalion is heavily attacked by Mi-24 helicopters. With no cover from ground units, Soviet helicopters take serious damage, but they are nonetheless able to inflict moderate losses to the West German unit and force it to retreat back into Braunschweig. 

British 4th Armoured division repeatedly assault the last survivors of 76th Guards Airborne division. The Soviet paratroopers finally surrender: Only 450 of them are taken as prisoners, the rest being killed in action. 

British I Corps is finally able to establish a solid defense line around Hildesheim.

In the South, the still unengaged West German 2 Panzergrenadier division prepares for a night counterattack against the now exposed Soviet 7th Guards Tank.


D+0 H21

The nightfall slows down the Warsaw Pact advance, as despite the bombastic plans about a 24-hours continuous offensive it has quickly became obvious that in poor visibility conditions NATO has a decisive edge on Pact's forces.

Soviet 35th Motorized Rifle division changes the Posture of a couple regiments in order to renew the assault on Braunschweig at dawn.

Soviet 7th Guards Tank starts crossing the river Leine unopposed, with apparently nothing ahead to block its advance. 

NATO continues to organize and stabilize the front. British 7/1A brigade starts entrenching around Hildesheim, while West German 6/2PG brigade receive additional Electronic Warfare assets to support the upcoming counterattack.

The first elements of Belgian I Corps are finally approaching their combat positions.

D+1 H00

Warsaw Pact's SIGINT detects the location of British 7/1A brigade HQ. A combined SSM + Air strike follows minutes later, almost destroying the Britons' command post (hex 3610).

NATO Prepared Demolition of bridge in hex 4608 fails, giving Soviet 25th Tank division a golden opportunity to cross the Aller river quickly. Luckily for NATO, the Soviet artillery fails to give adequate support and the crossing attempt is blocked.

Pressed by the High Command, Soviet 35th MRD assaults once again the center of Braunschweig, supported by Sappers and heavy artillery barrage. West German 2/1Pz brigade repels the attacks, with moderate losses for Warsaw Pact. Despite the success, the defenders are worn out and in a dangerous position, so the city center is left to the Soviet.

10th Guards Tank division with Sappers support attacks Hildesheim, defended by British 7/1A brigade. NATO Electronic Warfare completely disorganizes the assault, stopping it cold since the start.

In the South, 7th Guards Tank makes contact with the Belgian covering forces, forcing them to retreat.

West German 2/1Pz brigade slowly retreats from Braunschweig, preparing a new defense line behind the Stichkanal Salzgitter. During the retreat, two separate attempts to destroy the central bridges fail, leaving an easy crossing route to the enemy. 

Britons continue to strengthen the defenses around Hildesheim, with 4th Armoured division now covering their Southern flank.

Belgian 4/16Pz brigade leaves Road Posture and prepare defending its assigned positions.

In the South, West German 2PG division springs the trap. The bridge in hex 3218 is destroyed by an artillery bombardment, effectively isolating part of Soviet 7th Guards Tank on the West bank of  river Leine, while 6/2PG and 4/2PG brigades advance North on both sides of the river. The attack takes the Soviets by complete surprise, forcing several combat and support battalions to a disordered retreat.

D+1 H03

To slow down the NATO counterattack in the South, a whole Soviet 9K76 Temp-S SSM regiment is assigned to a strike against West German's 6/2PG brigade HQ presumed location. Unfortunately for Warsaw Pact, the intelligence was far from accurate and the strike has no effect.

7th Guards Tank advance has stopped. Soviet engineers frantically start building a Panel Bridge to replace the destroyed one and restore the contact between 7th Guards Tank and the rest of 3rd Shock Army. Emergency Rafts are also deployed. 

A combined assault from 7th Guards Tank and 47th Guards Tank forces NATO to abandon the terrain gained a few hours before, but the losses for Warsaw Pact are heavy and several artillery battalions are near the breaking point.

Things are going better in the Celle area, with 90th Guards Tank hardly pressing on WG 33/11PG brigade.

NATO bombards 3/670G artillery battalion, already fatigued and in disarray, destroying it completely (hex 3118).

West German 6/2PG brigade renews the counterattack with a fresh Panzer battalion switching from Active Defense to Assault Posture. The attack routs 55th Guards Tank regiment, inflicting heavy losses and putting once again the whole Soviet division in a dangerous position. To make things worse, British 33/4 Armoured brigade is also approaching from the North.

Debriefing

At D+1, H03 the situation for Warsaw Pact looks quite bad. The only really promising advance axis turned into a chaotic mess due to the NATO counterattack, and losses are rapidly mounting. It's true that only a fraction of the available forces have been committed and a powerful reserve of four divisions is ready to enter the fray, but they're not in the best position due to a ill-conceived initial plan.

Admittedly, Warsaw Pact's 3rd Shock Army fell into the trap quite foolhardy, but on the other hand what should a Soviet Army Commander, trained and indoctrinated to the all-out advance dogma, do? Stopping and being prudent sounds out of question in most of cases.

Another decisive mistake was probably the insertion of 76th Guards Airborne right in the middle of BAOR. A drop further South along the Weser, at the crossing points needed by Belgian I Corps, would have forced NATO to take dangerous countermeasures as the Belgian arrival would have been delayed by at least 12 hours.

Finally, the battle for Braunschweig kept half of 20th Guards Tank Army busy for one full day. A better choice would have been to bypass it South, thus giving real support to the 3rd Shock Army Northern flank, and leave the mop-up to a Second Echelon division.

Oh well, I've failed the Rodina. The only remaining option is my Makarov pistol.


Tuesday, 1 September 2020

The Dogs of War - The River Weser Deep and Wide


Playtest for "The River Weser Deep and Wide" campaign is going well, with the changes and addition to the rules working as planned. I'm not entering in details right now, but you'll find everything in the complete AAR we're going to publish soon :)

In the meantime, here's a video coverage of the first day of combat, from the initial attack at H0600 to the sunset of the first day, around H2100. 

As a bonus, If you think you've discovered what the NATO overall plan is for D+1, send an email to info@TRLGames.com! The first to guess it correctly gets a 50% discount on his The Dogs of War copy :)